There’s something almost magical about pulling fresh strands of pasta from a rolling pin, dusted with flour and ready to transform into the foundation of an incredible meal. Most people assume homemade pasta is reserved for Italian grandmothers or professionally trained chefs, but the truth is far simpler. With just a few basic ingredients and some practice, you can create restaurant-quality pasta in your own kitchen that puts dried, boxed varieties to shame.
The beauty of making pasta from scratch isn’t just in the superior taste and texture. It’s in the satisfaction of creating something with your hands, the flexibility to customize flavors and shapes, and the surprisingly meditative rhythm of kneading and rolling dough. Whether you’re looking to impress dinner guests or simply elevate your weeknight cooking, this guide will walk you through everything you need to know to master the art of homemade pasta.
Why Homemade Pasta Makes a Difference
The contrast between fresh and dried pasta goes far beyond simple preference. Fresh pasta has a tender, delicate texture that absorbs sauces differently, creating a more cohesive dish where pasta and sauce truly complement each other. The eggs in traditional fresh pasta dough give it a rich, slightly sweet flavor that you simply cannot replicate with dried alternatives.
Beyond taste and texture, making your own pasta opens up creative possibilities. You can adjust thickness for different dishes, incorporate herbs or vegetable purees directly into the dough, and create shapes that are difficult or expensive to find in stores. Plus, fresh pasta cooks in just 2-3 minutes compared to 8-12 minutes for dried pasta, making it surprisingly practical for busy schedules once you’ve prepared your dough.
For those interested in expanding their culinary skills beyond pasta, our guide to mastering knife skills can help you prepare ingredients with professional precision.
Essential Equipment You’ll Need
One of the best aspects of pasta making is that it requires minimal specialized equipment. At its most basic, you need only a clean work surface, a rolling pin, and a sharp knife. However, a few additional tools can make the process easier and more enjoyable, especially as you progress beyond your first few batches.
A pasta machine is the single most valuable investment for regular pasta makers. Manual crank models offer excellent results without the high price tag of electric versions. They provide consistent thickness and make rolling large batches far less physically demanding. Look for machines with adjustable thickness settings and cutting attachments for fettuccine and spaghetti.
A bench scraper helps manage sticky dough and clean your work surface efficiently. A pastry wheel or sharp knife allows you to cut shapes cleanly. Some home cooks swear by a wooden work surface, claiming it provides better traction for kneading, though any clean, dry counter works perfectly fine. If you’re curious about which kitchen tools truly deserve space in your kitchen, check out our breakdown of essential kitchen equipment.
The Basic Pasta Dough Recipe
Traditional Italian pasta dough follows a beautifully simple ratio: approximately 100 grams of flour per egg. For a standard batch that serves 3-4 people, you’ll need 300 grams (about 2 1/4 cups) of all-purpose or “00” flour and 3 large eggs. That’s it. No water, no oil, just flour and eggs working together to create something greater than the sum of their parts.
The type of flour does matter, though both all-purpose and specialized “00” flour work well. Italian “00” flour is more finely ground and produces slightly silkier pasta, but all-purpose flour creates excellent results and is easier to find. Some recipes add a pinch of salt or a small amount of olive oil, but these are optional additions that slightly change texture rather than essential components.
The classic technique involves creating a flour well on your work surface, cracking eggs into the center, and gradually incorporating flour with a fork. This traditional method gives you direct control over dough consistency, though you can also mix ingredients in a food processor for faster, more consistent results. Both approaches work beautifully once you understand what properly hydrated dough should feel like.
Mixing and Kneading Techniques
If using the traditional well method, start by mounding your flour on a clean work surface and creating a wide crater in the center. Crack your eggs into this well and beat them gently with a fork, gradually pulling in flour from the inner walls. Work slowly and carefully during this stage because if your well breaks, you’ll have egg running across your counter.
Once the mixture becomes too thick to stir with a fork, use your hands to bring it together into a shaggy mass. At this point, the dough will look rough and uneven, with dry patches of flour and sticky sections. This is completely normal. Begin kneading by pushing the dough away from you with the heel of your hand, folding it back over itself, rotating a quarter turn, and repeating.
Kneading develops gluten strands that give pasta its characteristic chew and elasticity. You’ll need to knead for about 8-10 minutes until the dough becomes smooth, elastic, and slightly tacky but not sticky. The transformation is remarkable. What starts as a rough, uncooperative mass becomes silky and responsive. When properly kneaded, the dough should spring back slowly when poked. Wrap it in plastic wrap and let it rest at room temperature for at least 30 minutes before rolling. This resting period allows gluten to relax, making the dough much easier to roll thin.
For additional guidance on the pasta-making process, this step-by-step tutorial provides helpful visual references for each stage.
Rolling and Shaping Your Pasta
After resting, divide your dough into four equal pieces, keeping unused portions covered to prevent drying. If using a pasta machine, flatten one piece into a rough rectangle about 1/2 inch thick. Set your machine to the widest setting and run the dough through 2-3 times, folding it in half between passes. This lamination process further develops gluten and creates a smoother texture.
Gradually work through progressively thinner settings, running the dough through once at each level. You don’t need to fold between these passes. For most shapes, you’ll want to roll to the second-thinnest setting. The dough should be thin enough to see your hand through it but still have enough body to hold its shape. If the dough becomes too long to handle comfortably, cut it in half and work with smaller sections.
For hand rolling, the process requires more physical effort but produces equally excellent results. Dust your work surface lightly with flour and use a long rolling pin to roll from the center outward, rotating the dough frequently to maintain an even thickness. This comprehensive guide offers additional tips for achieving professional results.
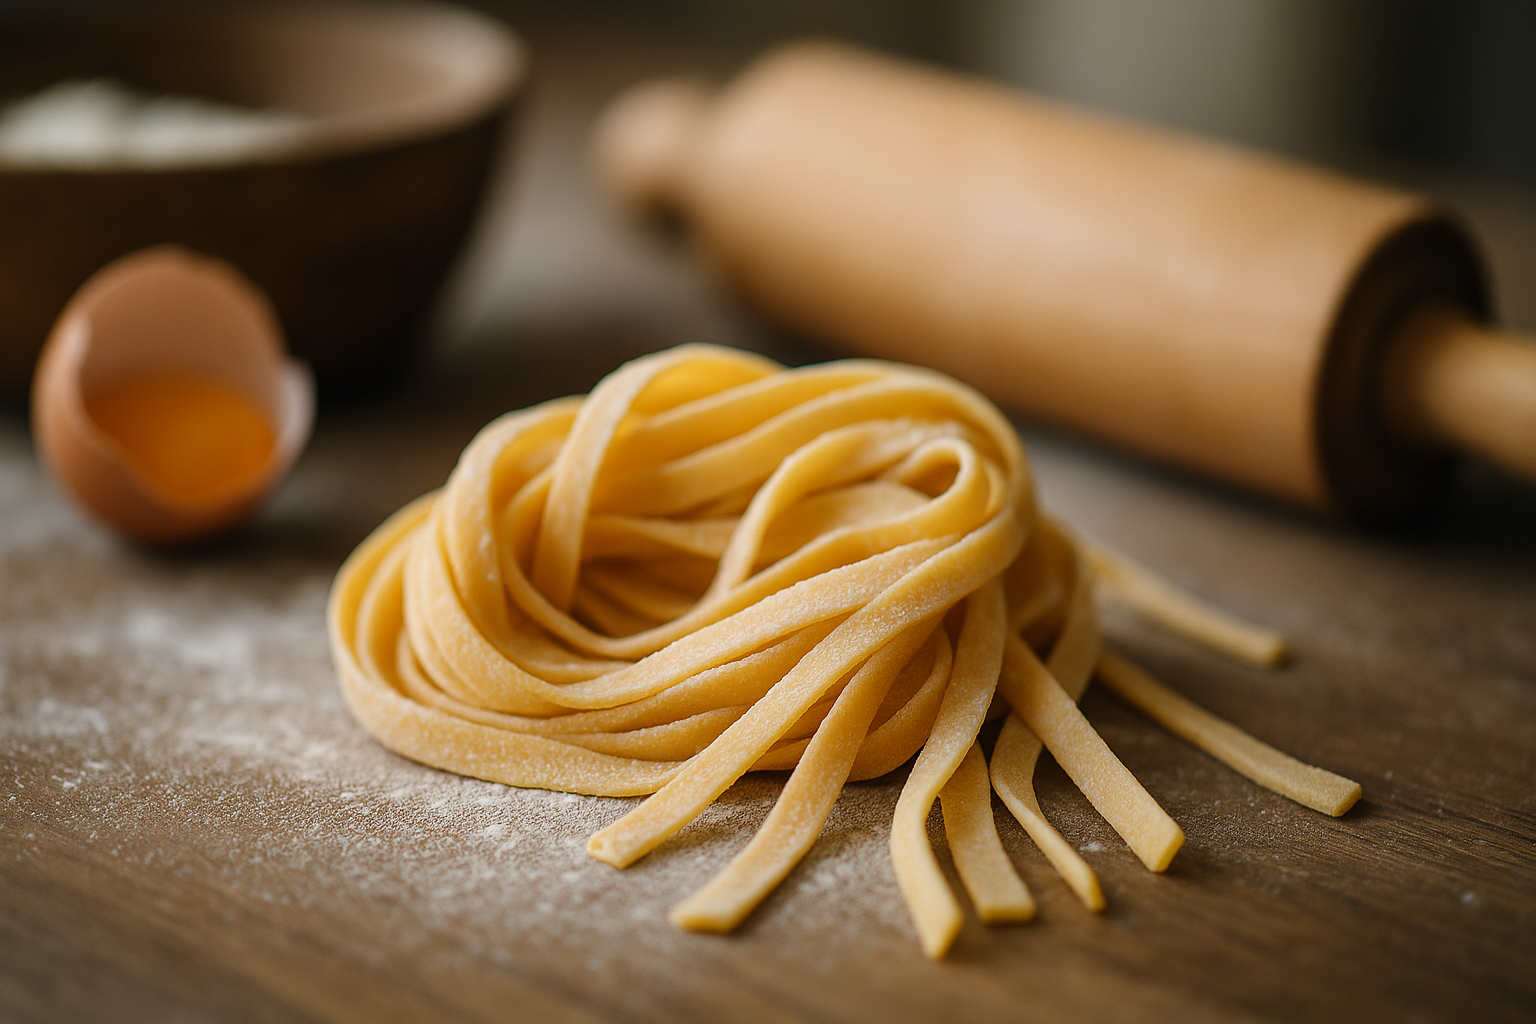
Once rolled, you can cut pasta into your desired shape. For fettuccine or tagliatelle, lightly dust the sheet with flour, roll it loosely, and cut crosswise into strips of your preferred width. Unroll immediately and toss with a bit more flour to prevent sticking. For filled pastas like ravioli, work quickly to prevent the dough from drying out, as you need slightly moist edges to seal properly.
Cooking Fresh Pasta to Perfection
Fresh pasta cooks dramatically faster than dried pasta, which catches many first-time makers off guard. Bring a large pot of well-salted water to a rolling boil. The water should taste like the sea, as this is your only opportunity to season the pasta itself. Drop your fresh pasta into the boiling water and stir gently to prevent sticking.
Most fresh pasta cooks in just 2-3 minutes, though filled pastas may take slightly longer. The pasta is done when it floats to the surface and tastes tender with a slight chew. Fresh pasta should never be mushy or gummy. If you’re planning to toss it with sauce, slightly undercook the pasta and finish it in the sauce pan, allowing it to absorb flavors while reaching perfect doneness.
Reserve at least a cup of pasta cooking water before draining. This starchy liquid is gold for creating cohesive sauces that cling to pasta rather than pooling at the bottom of the bowl. Understanding how to balance flavors with salt, fat, acid, and heat will help you create perfectly seasoned dishes every time.
Troubleshooting Common Pasta Problems
Even experienced pasta makers encounter occasional challenges. If your dough feels too dry and won’t come together, lightly wet your hands and knead the moisture into the dough. You can also cover it with plastic wrap for 10 minutes to allow existing moisture to distribute more evenly. Conversely, if dough is too sticky, incorporate small amounts of flour during kneading, but add conservatively as too much flour creates tough pasta.
Pasta that tears during rolling usually indicates insufficient kneading or resting time. The gluten network needs proper development and relaxation to stretch thin without breaking. If sheets tear repeatedly, knead the dough for another few minutes, let it rest for 15-20 minutes, and try again. Temperature matters too. Dough that’s too cold becomes stiff and resistant, while overly warm dough turns sticky and unmanageable.
When pasta sticks together after cutting, you haven’t used enough flour for dusting. Fresh cut pasta should be tossed generously with flour and can even be formed into small nests, which makes storage easier and prevents tangling. If you’re making pasta ahead, these nests can be refrigerated for up to 24 hours or frozen for several months.
Storing and Preserving Homemade Pasta
Fresh pasta doesn’t need to be cooked immediately. You can refrigerate it for 1-2 days or freeze it for up to three months. For short-term storage, dust pasta generously with flour, form into nests or lay flat on a baking sheet, cover with plastic wrap, and refrigerate. The pasta may dry slightly, which actually isn’t a problem. Slightly dried fresh pasta cooks beautifully and has better texture than completely fresh pasta.
For freezing, arrange pasta in a single layer on a parchment-lined baking sheet and freeze until solid, then transfer to freezer bags. This prevents clumping and allows you to remove only what you need. Frozen pasta can go directly into boiling water without thawing, though it may need an extra minute of cooking time. This makes homemade pasta surprisingly practical for meal prep strategies, allowing you to enjoy fresh pasta quality on busy weeknights.
Some home cooks dry their pasta completely for longer storage. Hang long strands over a pasta drying rack or the back of a chair, or spread shorter shapes on a baking sheet. Complete drying takes 12-24 hours depending on humidity. Once thoroughly dry, pasta can be stored in airtight containers for several weeks, though it loses some of the tender texture that makes fresh pasta special.
Taking Your Pasta Skills Further
Once you’ve mastered basic egg pasta, numerous variations await exploration. Spinach pasta incorporates cooked, squeezed-dry spinach that’s been pureed and mixed with eggs before adding flour. The result is vibrant green pasta with subtle earthy flavor. Beet pasta follows the same principle, creating stunning magenta sheets perfect for special occasions.
Herb-infused pasta adds visual interest and delicate flavor. Press whole herb leaves onto rolled pasta sheets, cover with another thin layer of dough, and roll once more to seal. The herbs become suspended between layers, creating beautiful patterns when cut. Squid ink pasta offers dramatic black color and briny ocean flavor that pairs excellently with seafood.
Regional Italian shapes each have traditional uses and sauce pairings. Wider ribbons like pappardelle work beautifully with hearty meat ragus, while delicate angel hair suits light olive oil or butter-based sauces. Filled pastas like tortellini and agnolotti become weekend projects that yield impressive results. The more you practice, the more intuitive the process becomes, transforming from a special occasion activity into a regular part of your cooking repertoire.
Making pasta from scratch might seem daunting initially, but it’s one of those skills that rewards practice with increasingly effortless execution. The basic technique remains constant whether you’re creating simple fettuccine or elaborate filled shapes. Start with the fundamental egg dough recipe, focus on developing a feel for proper texture and consistency, and don’t worry about perfection in your early attempts. Even imperfect homemade pasta tastes better than most store-bought alternatives. With each batch, you’ll develop muscle memory for kneading, a better eye for proper dough hydration, and confidence in your ability to create something truly special with just flour and eggs.
Leave a Reply